You may be wondering how to create a Facebook business page. Facebook is the largest social media platform, with 2.60 billion monthly active users. If your small business is not taking advantage of Facebook or other social media platforms, you are severely missing out.
When it comes to promoting your business, Facebook is a great option because it allows for all of your business information to be on one page. Facebook even allows you to customize your page based on your business, such as the call to action button. Of course, you need to know how to create a Facebook business page to take advantage of the platform.
Here are the steps of how to create a Facebook business page on a desktop or laptop:
Step 1: Create the Page
Important note: you must have a Facebook profile to start a business page.
Open a browser and go to Facebook.com. Login if you aren’t already and find the left-hand sidebar. This bar will have buttons for friends, the marketplace, groups, and more. If this bar is not on the screen’s left-hand side, click on the Facebook logo in the top left.

The sidebar should appear, and the options aforementioned will be at the top. Select the “See More” option and find “Pages.”
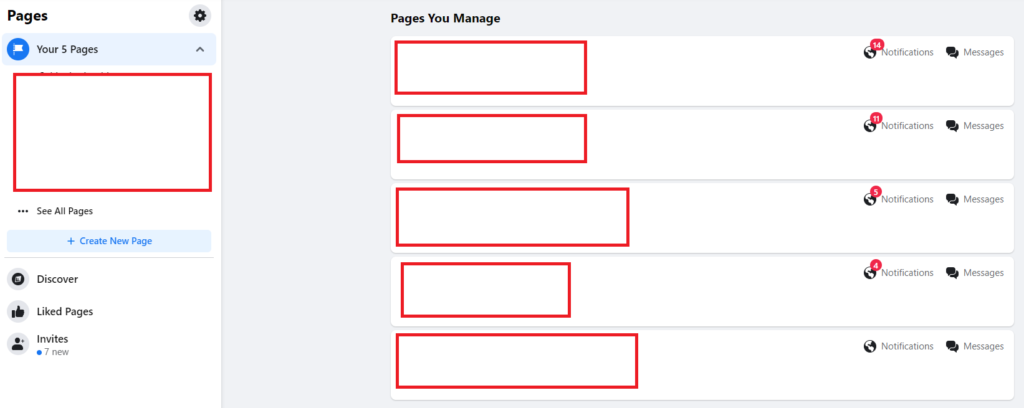
Any pages you are already managing or invites to other pages will appear here. On the left, select the button that reads “Create New Page.”
Step 2: Fill Out Business Info
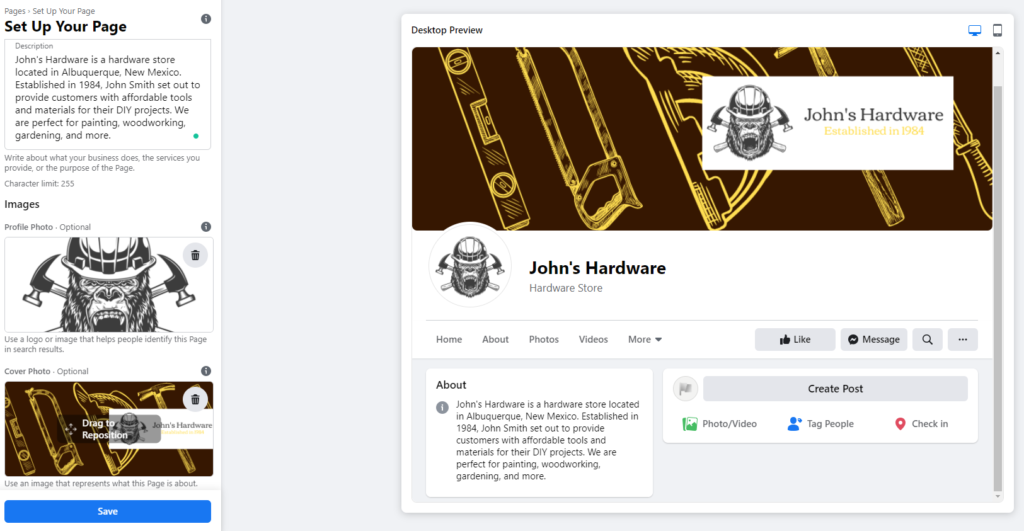
After creating a new page, you will be presented with a preview of your business page. On the left, you can fill out the business/organization name, category, and description. As you add information, the preview reflects your changes. The preview can also be changed to the desktop and phone views.
Once all the appropriate information is filled out, select the “Create Page” at the bottom of the sidebar. Afterward, you are presented with options of uploading a profile picture and featured image.

Facebook recommends your profile picture is at least 180 x 180 pixels. However, the best option is 360 x 360 pixels. As for the featured image, the size should be 820 x 312 pixels. When you are comfortable with how your pictures look on your preview, press the “Save” button at the bottom of the sidebar.
Step 3: Add More Business Info
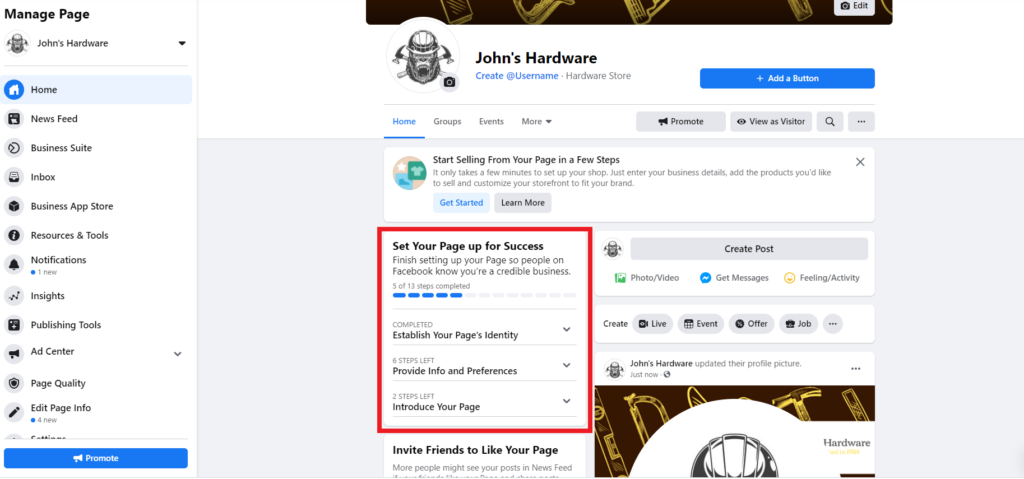
As we have already said, Facebook business pages compile as much business information as possible. Filling out all the appropriate business information on your Facebook page will take some time, but it is worth every minute. Facebook makes it easy, with a “Set Your Page up for Success” section. This section outlines all the things you can customize to make your business page user-friendly and unique.
The “Provide Info and Preferences” drop-down features the following information:
- website
- location
- phone number
- business hours
- messaging preference
- add page button

The messaging preference allows you to change the default messaging application for when people want to ask your business questions. You have the option of Facebook Messenger or WhatsApp. Facebook Messenger is the default, so you don’t have to do anything if that is your preference. For WhatsApp, follow the prompts to connect your account.
Adding a page button is the type of call to action on your page. There are a lot of options in this section, but some of the most common include:
- Start Order
- Book Now
- Call Now
- Contact Us
- Get Quote
If none of these options fit your business, you can take a look at their other options. Every business can find the perfect call to action button in this section. Determine what the best is for you, and follow the prompt to customize the option.
You can always come back to this detail or change it later. The button is located at the top-right of your business page below the featured image.
Step 4: Invite Others
The “Introduce Your Page” drop-down menu asks you to invite others to like your business page. When people like a Facebook business page, they follow it. Any updates or posts on your business page will show up in their feed. The option to invite friends to like the page is perfect for gaining traction and attention from customers.
You don’t have to invite everyone to like the page. When you select the option, Facebook will let you choose who you want to send an invite to. From there, they will get a notification to like the page.
Step 5: Create a Username

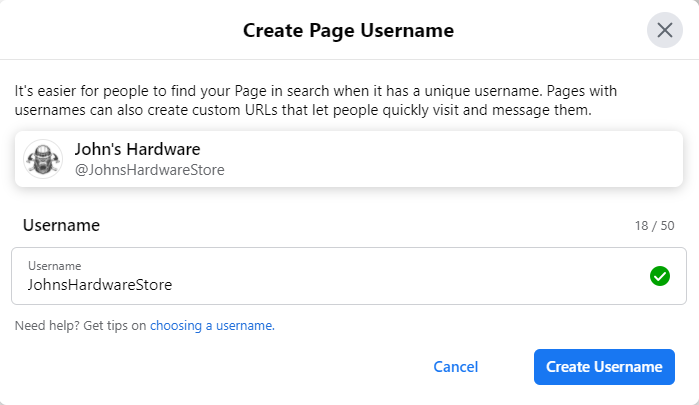
The username option for your Facebook business page is a little hidden, so you may miss it. This small detail will help customers find your business more easily as it is a unique name only for your business. There could be eight other John’s Hardware’s on Facebook, but a customized username will make your business easier to identify.
You can find this setting on the top of your page underneath your business name and to the right of the profile picture. You should see a blue button that reads “Create @ Username.” Select that button and then create a username for your business.
Spaces are not allowed in your username, and it’s likely your business name is already taken. If it isn’t taken, great! For those that are having a hard time creating a username, consider adding the state abbreviation or state at the end (@JohnsHardwareNM or @JohnsHardwareNewMexico). You may also add a keyword within your username (@JohnsHardwareStoreNearMe). As long as your username is below 50 characters and relates to your business, it should be effective.
Step 6: Start Posting
Now that you finally know how to create a Facebook business page, you can start posting content for your page. Facebook’s “Set Your Page up for Success” section gives you an option to create a welcome post. Do this soon after inviting others to your page, so it’s one of the first things they see on your business page. From there, you can start posting updates about your business.
You Know How to Create a Facebook Business Page
Now that you know how to create a Facebook business page, you can start marketing your business to customers. Social media marketing is a powerful tool, and it’s free! If you need help with your social media marketing, contact ASAP Marketing Solutions. You can reach our team for a free estimate by calling (832) 737-2752.
